26.07.2023
Charger for lithium ion batteries. Charger for lithium-ion batteries
Hi all! Today I’ll tell you and show you charging circuit for lithium-ion batteries from 12 volts. Such a charger can be useful when fishing, on a hike to charge flashlights, or at home when using a 12-volt power source.
So, a charger assembled according to this scheme is suitable for lithium-ion batteries with a capacity of 900 mAh or more. The charger can be powered from any 12 V power source or from a car cigarette lighter. The maximum charge current will be about 650 mA.
This is what the finished assembled device looks like:

The scheme is quite simple. Initially, it can be seen that the output voltage of 8.4v is intended for charging a pair (2) of cans. But it is not so. The fact is that the variable resistor in the circuit (R4) is responsible for the voltage. With its help, you can adjust the output voltage for both one 4.2V element and a pair of elements with a total voltage of 8.4V.
To create such a charge you will need:
- Regulator with adjustable output voltage LM317
- 2N2222A or any transistor that handles 800mA
- 2 Capacitors 0.1 µF
- Resistor 1 ohm 1Watt
- Variable resistor 1K
- Not a big heatsink for LM317
Resistor R4 sets the required output voltage
R1 controls the output current
Photo of the board after etching and in assembled condition:


Features of charging lithium batteries and chargers for them
Modern people use many electronic gadgets. This is a laptop, mobile phone, tablet, camera and many others. Most of these devices are powered by lithium batteries. After all, we value them precisely because they are mobile devices. However, portability comes at the cost of having to constantly charge the batteries. To do this, you will need a lithium battery charger. In most cases, chargers are supplied with the device itself. This is the same power adapter for a laptop or phone. Ideally, of course, the standard charger should be used for charging. But what to do if it is lost or damaged. You need to choose a suitable charger. What to take into account will be discussed in this article.
In general, the charger should have an output voltage of 5 volts and a current whose value corresponds to (0.5─1)*Cn. CH is the nominal capacity of the battery. For example, for a lithium cell with a capacity of 2200 mAh, charging should produce a current of 1.1 amperes.

Most chargers from reputable manufacturers charge Li batteries in several stages. The first stage occurs at a constant current value of 0.2─1 C and a voltage of 4.1─4.2 V (here we mean the voltage per element or jar). This stage lasts approximately 40-50 minutes. The second stage is carried out at constant voltage. There are devices that use pulse mode to speed up the charging process. For lithium-ion systems with a graphite system, voltages must be limited to 4.1 volts per cell.
If you use a voltage higher than 4.1 volts, you can increase the energy density of the battery. But at the same time, oxidative reactions begin, which shorten the battery life. In later models this problem was corrected with additives. And the voltage on them during charging can be increased to 4.2 volts with a deviation of 0.05 per element.
If we talk about lithium batteries for industrial use and for the military sector, then chargers for them support a voltage of 3.9 volts. This ensures long service life and reliability.
If the charger produces a current of 1C, the battery will charge in about 2-3 hours. When the charge is fully charged and the voltage reaches the cutoff value, the current decreases sharply and amounts to several percent of the original value.
It is worth saying that as the charging current increases, the charging time practically does not decrease. At a higher current, the voltage rises faster in the first stage of the process, but the second stage of recharging in this case takes longer.
There are chargers that can charge a lithium battery in about an hour. This charger for lithium batteries does not have a second stage and the battery is ready for use after the completion of the first stage. The battery charge level will be 70 percent. But, due to the nature of lithium batteries, this is not critical for them.
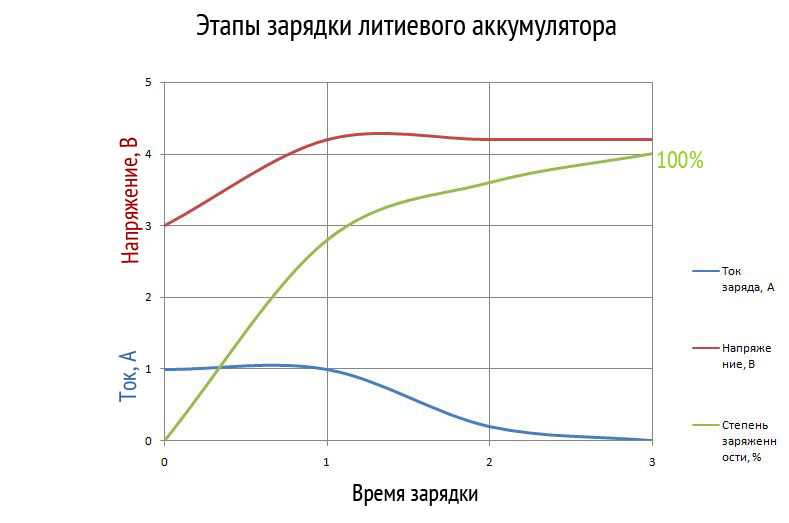
In the graph above you can see three stages of charging a Li battery:
- First. The maximum possible (1C) charge current flows through the battery. This stage ends when the voltage increases to a threshold value;
- Second. The voltage remains maximum (4.1─4.2 volts), and the charging current decreases to 3 percent of the original value;
- Third. Compensating charge during storage (carried out approximately once every 20 days).
During the storage phase, trickle charging is not possible for lithium batteries due to the fact that this leads to metallization of the Li. But short-term recharging with direct current compensates for the loss of charge. This charging should be performed when the cell voltage drops to 4.05 volts. The charging process stops at 4.2 volts.
And one more important point. Lithium battery cells are very sensitive to overcharging. Even with a slight recharge, lithium metallization begins on the surface of the negative electrode. It is very active and interacts with the electrolyte. As a result of the reaction at the cathode, oxygen is released and the pressure increases. As a result, element depressurization, ignition, and even a small explosion may occur.
In addition, if the charging voltage is continually exceeded, the life of lithium batteries will be reduced. Therefore, in most lithium batteries, in addition to the cells themselves, there is a protection board.


The board controls the process of charging and discharging elements according to the lower and upper voltage limits. Temperature sensors are often used to switch off elements at 90 degrees Celsius. Some types of batteries have a mechanical valve that opens when the pressure inside the case increases above a certain limit.
There are exceptions. For example, batteries containing manganese do not have such protection. Manganese strongly inhibits metallization at the anode and the formation of oxygen. Therefore, such protection is not necessary.
All this needs to be kept in mind when choosing a charger. If you will charge the lithium can directly without a controller, the voltage must be monitored constantly. But it is much better to use devices with automatic control or charge the battery through a protection board.
Chargers for various gadgets
Chargers for smartphone batteries
If you have lost the standard charger for your phone, the “frog” will help you. This is one of the most common devices. The charge received its name for its characteristic shape.

It couldn't be easier to use. The charger has 2 width-adjustable contacts: plus and minus. You need to install them in a position suitable for the battery being charged. Then the battery is inserted so that there is contact with its terminals, and is fixed with the upper clamping bar. Naturally, polarity must be observed during installation. Then the device is inserted into the 220 volt connector and charged until the indicator shows the end of the process.
Charger for li ion batteries, the diagram of which is given in this article, was developed based on the experience of designing similar chargers, efforts to eliminate errors and achieve maximum simplicity. The charger has a highly stable output voltage.
Description of charging for lithium-ion batteries
The main design element is (IO1) - the reference voltage source. Its stability is much better than acceptable, and, as is known for lithium-ion batteries, this is a very important characteristic when charging.
Element TL431 is used in this circuit as a current stabilizer in the operation of transistors T1 and T2. Charging current flows through R1. If the voltage drop across this resistor exceeds approximately 0.6 volts, the current flowing through transistors T1 and T2 is limited. The value of resistor R1 is equivalent to the charging current.
The output voltage is controlled by the aforementioned TL431 element. The value is determined by the output voltage divider (R5, R7, P1).
Components R4, C1 for noise suppression. It is very convenient to indicate the amount of charging current using LED1. The glow shows how much current flows in the base circuit of transistor T2, which is proportional to the output current. As the lithium-ion battery charges, the brightness of the LED gradually decreases.
Diode D1 is designed to prevent the lithium-ion battery from discharging when there is no voltage at the charger input. The battery charging circuit does not need protection from incorrect polarity connection of the li-ion battery.
All components are placed on a single-sided printed circuit board.
 Current sensor - resistor R1 consists of several resistors connected in parallel. Transistor T2 must be placed on the heat sink. Its size depends on the charging current and the voltage difference between the input and output of the charger.
The circuit of the lithium-ion battery charger is so simple that if the radio components are installed correctly, it should work the first time. The only thing that may be required is to set the output voltage. For a lithium-ion battery, this is approximately 4.2 volts. When idling, transistor T2 should not be hot. The input voltage must be at least 2 volts higher than the required output voltage.
The circuit is designed for charging current up to 1 ampere. If you need to increase the charge current of a li-ion battery, then it is necessary to reduce the resistance of resistor R6 and the output transistor T2 must be of increased power.
At the end of the charging process, the LED still glows a little, to eliminate this, you can simply connect a resistor with a resistance of 10...56 kOhm in parallel with the LED. So, when the charging current drops below 10 mA, the LED will stop lighting.
http://web.quick.cz/PetrLBC/zajic.htm
Modern electronic devices (such as cell phones, laptops or tablets) are powered by lithium-ion batteries, which have replaced their alkaline counterparts. Nickel-cadmium and nickel-metal hydride batteries have given way to Li─Ion batteries due to the better technical and consumer qualities of the latter. The available charge in such batteries from the moment of production ranges from four to six percent, after which it begins to decrease with use. During the first 12 months, battery capacity decreases by 10 to 20%.
Original chargers
Charging units for ion batteries are very similar to similar devices for lead-acid batteries, however, their batteries, called “banks” for their external similarity, have a higher voltage, so there are more stringent tolerance requirements (for example, the permissible voltage difference is only 0. 05 c). The most common format of a 18650 ion battery bank is that it has a diameter of 1.8 cm and a height of 6.5 cm.
On a note. A standard lithium-ion battery requires up to three hours to charge, and the more precise time is determined by its original capacity.
Manufacturers of Li-ion batteries recommend using only original chargers for charging, which are guaranteed to provide the required voltage for the battery and will not destroy part of its capacity by overcharging the element and disrupting the chemical system; it is also undesirable to fully charge the battery.

Note! During long-term storage, lithium batteries should optimally have a small (no more than 50%) charge, and it is also necessary to remove them from the units.
If lithium batteries have a protection board, then they are not in danger of being overcharged.
The built-in protection board cuts off excessive voltage (more than 3.7 volts per cell) during charging and turns off the battery if the charge level drops to a minimum, usually 2.4 volts. The charge controller detects the moment when the voltage on the bank reaches 3.7 volts and disconnects the charger from the battery. This essential device also monitors the temperature of the battery to prevent overheating and overcurrent. The protection is based on the DV01-P microcircuit. After the circuit is interrupted by the controller, its restoration is carried out automatically when the parameters are normalized.

On the chip, a red indicator means charge, and green or blue indicates that the battery is charged.
How to properly charge lithium batteries
Well-known manufacturers of li-ion batteries (for example, Sony) use a two- or three-stage charging principle in their chargers, which can significantly extend the battery life.
At the output, the charger has a voltage of five volts, and the current value ranges from 0.5 to 1.0 of the nominal capacity of the battery (for example, for an element with a capacity of 2200 milliamp-hours, the charger current should be from 1.1 amperes.)
At the initial stage, after connecting the charger for lithium batteries, the current value is from 0.2 to 1.0 of the nominal capacity, while the voltage is 4.1 volts (per cell). Under these conditions, the batteries charge in 40 to 50 minutes.
To achieve constant current, the charger circuit must be able to raise the voltage at the battery terminals, at which time the charger for most lithium-ion batteries acts as a conventional voltage regulator.
Important! If it is necessary to charge lithium-ion batteries that have a built-in protection board, then the open circuit voltage should not be more than six to seven volts, otherwise it will deteriorate.
When the voltage reaches 4.2 volts, the battery capacity will be between 70 and 80 percent capacity, which will signal the end of the initial charging phase.
The next stage is carried out in the presence of constant voltage.
Additional Information. Some units use a pulse method for faster charging. If the lithium-ion battery has a graphite system, then they must comply with the voltage limit of 4.1 volts per cell. If this parameter is exceeded, the energy density of the battery will increase and trigger oxidation reactions, shortening the life of the battery. In modern battery models, special additives are used that allow the voltage to be increased when connecting a charger for li ion batteries to 4.2 volts plus/minus 0.05 volts.
In simple lithium batteries, chargers maintain a voltage level of 3.9 volts, which for them is a reliable guarantee of long service life.
When delivering a current of 1 battery capacity, the time to obtain an optimally charged battery will be from 2 to 3 hours. As soon as the charge becomes full, the voltage reaches the cutoff norm, the current value rapidly drops and remains at the level of a couple of percent of the initial value.
If the charging current is artificially increased, the time of use of the charger to power lithium-ion batteries will hardly decrease. In this case, the voltage initially increases faster, but at the same time the duration of the second stage increases.
Some chargers can fully charge the battery in 60-70 minutes; during such charging, the second stage is eliminated, and the battery can be used after the initial stage (the charging level will also be at 70 percent capacity).
At the third and final charging stage, a compensating charge is carried out. It is not carried out every time, but only once every 3 weeks, when storing (not using) batteries. In battery storage conditions, it is impossible to use jet charging, because in this case lithium metallization occurs. However, short-term recharging with constant voltage current helps to avoid charge losses. Charging stops when the voltage reaches 4.2 volts.
Lithium metallization is dangerous due to the release of oxygen and a sudden increase in pressure, which can lead to ignition and even explosion.
DIY battery charger
A charger for lithium-ion batteries is inexpensive, but if you have a little knowledge of electronics, you can make one yourself. If there is no accurate information about the origin of the battery elements, and there are doubts about the accuracy of the measuring instruments, you should set the charge threshold in the region from 4.1 to 4.15 volts. This is especially true if the battery does not have a protective board.
To assemble a charger for lithium batteries with your own hands, one simplified circuit is enough, of which there are many freely available on the Internet.

For the indicator, you can use a charging type LED, which lights up when the battery charge is significantly reduced, and goes out when discharged to “zero”.
The charger is assembled in the following order:
- a suitable housing is located;
- a five-volt power supply and other circuit parts are mounted (strictly follow the sequence!);
- a pair of brass strips is cut out and attached to the socket holes;
- using a nut, the distance between the contacts and the connected battery is determined;
- A switch is installed to change the polarity (optional).
If the task is to assemble a charger for 18650 batteries with your own hands, then a more complex circuit and more technical skills will be required.
All lithium-ion batteries require recharging from time to time, however, overcharging as well as completely discharging should be avoided. Maintaining the functionality of batteries and maintaining their working capacity for a long time is possible with the help of special chargers. It is advisable to use original chargers, but you can assemble them yourself.
Video
I made myself a charger for four lithium-ion batteries. Someone will now think: well, he did it and did it, there are plenty of them on the Internet. And I want to say right away that my design is capable of charging both one battery and four at once. All batteries are charged independently of each other.
This makes it possible to simultaneously charge batteries from different devices and with different initial charges.
I made a charger for 18650 batteries, which I use in a flashlight, powerbanks, laptop, etc.
The circuit consists of ready-made modules and is assembled very quickly and simply.
Will need
- - 4 things.
- - 4 things.
- Paper clips.
Manufacturing a charger for different numbers of batteries
First we'll make the battery compartment. To do this, we take a universal circuit board with a large number of holes and ordinary paper clips.
We bite off these corners from the paper clips.

We insert it into the board, having previously tried on the length of the batteries you need. Because such a charger can be made not only for 18650 batteries.

We solder parts of the paper clips to the bottom of the board.

Then we take the charging controllers and place them on the remaining space on the board, preferably opposite each battery.

The charging controller will be mounted on these legs, made from a PLS connector.

Solder the module on top and to the board below. These legs will carry the power current to the module and the charging current to the batteries.

Four sections are ready.

Next, to switch charging points, we will install buttons or toggle switches.

The whole thing connects like this:

You may ask - why are there only three buttons and not four? And I will answer - since one module will always work, because one battery will always be charged, otherwise there is no point in plugging in a charger at all.
We solder the conductive tracks.

The result is that with buttons you can connect a place to charge from 1 to 4 batteries.

An LED is installed on the charge module, which indicates that the battery that is being charged from it is charged or not.
I assembled the entire device in half an hour. It is powered by a 5-volt power supply (adapter), which, by the way, also needs to be chosen wisely so that it charges all four batteries at once. The entire circuit can also be powered from a USB computer.
We connect the adapter to the first module, and then turn on the necessary buttons and the voltage from the first module will go to other places, depending on the switches that are turned on.

