06.04.2022
Proper site drainage diagrams and recommendations. Do-it-yourself drainage of the area
The dream of a landscaped suburban area may well become a reality. A local area with luxurious lawns, a beautiful garden, a productive vegetable garden, gazebos, patios, alpine slides - all this today can be arranged on soil of any quality and lands of any geodetic complexity, the main thing is to approach the decision correctly and not forget about such a procedure as site drainage.
This system is expensive, so in order not to get into trouble and not pay twice, you should figure out whether the existing landscape needs drainage, and if so, what type.
Why is drainage needed on the site?
What are the functions of drainage? The objectives of the system are as follows:
1. Collection of melt water.
2. Rainfall drainage.
3. Removal of groundwater beyond the boundaries of the territory.
It is not always advisable to comprehensively drain the soil by laying deep and surface drainage at the same time. Deep drainage systems are required only for swampy soil and those lands where the groundwater level is high. Linear drainage will not be superfluous anywhere. Seasonal flooding is typical for any climate zone. In addition, the quality of our soil generally leaves much to be desired. Clay soils have poor permeability, which also provokes the formation of puddles.
Linear drainage to prevent puddles
Flooded areas are death not only for plants, but also for wooden buildings and decorative structures. At best, they will have to be seriously repaired. At worst, demolish and install new ones. Both situations are financially costly, and if you consider that without drainage on the site there is a prospect of carrying out global reconstructions regularly, then it makes sense to think about preventing water stagnation.

Site deep drainage system
When site drainage is required
You will have to organize drainage from the land provided that the dacha area is located on a steep slope. To prevent storm flows from carrying away the fertile part of the soil, it will be necessary to create a surface, but not a point, but a linear drainage system with transversely broken channels capable of intercepting water and redirecting it to the storm sewer.

Drainage of a site on a slope
The reason to start installing drainage on the site with your own hands would be to place it in a lowland. In this case, it is initially a reservoir for collecting water flowing to it. In this option, drainage elements are located along the perimeter of the territory.

Drainage of a site located in a lowland
No less of a scourge are flat areas where water is poorly absorbed by the soil. This is where you need to design an entire system of point or linear drainage systems covering the entire area.
Collecting and standing puddles for a long time will tell you that the area needs to be drained. Inspect the lawn. Assess the condition of the bushes. Check if the soil is rotting. These tips are effective in already inhabited areas. On virgin lands, you will have to focus on what is happening in the area. Have the neighbors prepared a pit for the house and dug holes for the fence supports? Fabulous! Check them out. If there is an accumulation of water inside, try to figure out where it is flowing from. Ask the old-timers about the level of water in the wells over the past few years. If it turns out that groundwater lies less than a meter from the surface, then it is most likely impossible to do without installing drainage on the site.

Point drainage system
Surface drainage
“Drainage can be done with linear or point drainage”
The simplest solution. The surface system collects water from drains and the site. By providing rainfall with free flow paths, it relieves the soil from waterlogging.

Surface drainage ensures the collection of water from the site
To arrange such site drainage with your own hands, you do not need to involve specialists. There will be no large-scale work here. Drainage can be done with linear or point drainage. Point drainages are responsible for local moisture collection. This could be runoff from roofs or water from irrigation taps. To drain large areas, it is correct to lay out a linear drainage system.

Point drainage is responsible for local moisture collection
Surface drainage methods
An open drainage system can consist of either randomly generated grooves or parallel grooves. Each scheme has side inlets that carry water that enters the drainage to the central drain. What type of device surface drainage preference should be chosen according to the type of soil and topographical conclusions.

Open drainage channel
Drainage in a random area
The ditches of such storm drains are adapted to collect water from soil of low permeability, where there are extensive low-lying areas of stagnation, the elimination of which by smoothing the surface is impossible or unprofitable.
By and large, random linear drainage is the prerogative of fields. The ditches scattered across the field are not very large. Most often they are quite small and do not intersect with the main drainage lines.
The purpose of the random grooves is to ensure the outflow of moisture accumulated in low-lying islands. To make random drainage of a site with your own hands, simply dig small grooves with the appropriate slope angle. The soil extracted in this case can be used to fill small lowlands.

Linear drainage will ensure the outflow of accumulated moisture
Field stormwater channels should follow through the main mass of depressions towards the natural slope of the site. This is the only way to ensure complete drainage of the area.
Drainage in a parallel area
It is rational to equip this type of drainage on flat, difficult-to-dry soils with numerous small depression flaws. The parallelism of the grooves does not mean they are equidistant. The walking distance depends on the soil conditions.
Closed drainage

Deep drainage helps reduce groundwater levels
Closed drainage structures are universal. They can drain melt and storm water no less efficiently than surface drainage. Since the system is hidden underground, it does not interfere with landscaping, which makes it quite popular among gardeners.
Vertical drainage
The main elements of this type of drainage system are wells, traditionally installed near the house. The outflow of water accumulated in them occurs using pumps.
Drainage of a site of this type is carried out only according to a professionally drawn up project. Without engineering knowledge and specific skills, it is not worth taking on the installation of drainage on the site with your own hands. Carrying out the work will require the use of specific hydraulic equipment, so leave the solution to this task to those who know exactly how to do it.

Vertical site drainage system
Do-it-yourself site drainage: main nuances
Choice of type drainage system mainly affects the cause of flooding of the territory. Clay soils, which are characterized by retention of melt and atmospheric water, can be brought into order by arranging surface drainage. Open-type drainage grooves will be quite sufficient to quickly remove excess moisture from the serviced area.
If the cause of basement flooding, erosion of the foundation, and swelling of the soil is groundwater, then the problem will have to be solved with a thorough approach, that is, by deep drainage of the soil. Both options for installing drainage on the site are available as standalone options.
Point drainage
To create a local open drainage network, drawing up a design diagram is not necessary. Its arrangement is logical in the case when flooding of the site occurs only at certain points and only when there is excessive rainfall. Sloping areas are most often susceptible to flooding: the area near the porch, gazebos. Water is guaranteed to accumulate in relief irregularities.

Places for installing point drainage
In the case where the problem area is located near the very boundaries of the land, to ensure drainage, it is rational to complete the drainage on the site with a regular dug trench that extends beyond its boundaries.
In steel cases, having noticed places of stagnation of water, they are equipped with dug-in water intakes or closed tanks. The water collected in them can later be used to water the garden.
Linear drainage
“Ensuring the uninterrupted operation of the surface drainage system occurs by calculating the correct slope of the drainage ditches”
Digging ditches across the entire site or certain corners of it is the best way to drain clay soils. Here it would not hurt to sketch out a rough plan of the future system, on which to mark all the drainage branches and the location of the drainage well to which they are planned to be connected.

Example of a linear drainage plan
Ensuring the uninterrupted operation of the surface drainage system occurs by calculating the correct slope of the drainage ditches. The process of arranging linear drainage systems will be greatly facilitated by the presence of a natural slope at the site. On flat surfaces you will have to create an inclination angle artificially. This condition is mandatory. Ignoring it will cause stagnation of collected water in drainage channels.

For linear drainage on a flat surface, create a slope angle
The quantity of channels to be laid is determined according to the absorbency of the soil. The more clayey it is, the denser the drainage network is branched. The depth of the trenches dug for drainage of the site with your own hands is about half a meter. The width of the groove depends on its distance from the storage tank. The widest will be the main branch of the drainage system, where water flows from all parts of the site.
After the drainage system on the site has been dug, they begin to check the quality of its functioning. To do this, a strong flow of water is launched through the watering hoses through the channels. Correctly supply water from several points at the same time.
The assessment takes place “by eye”. If water flows slowly and accumulates somewhere, you will have to adjust the slope and perhaps even widen the groove.
After making sure that the drainage is ideal, you can start decorating the drainage of the area. The appearance of open ditches is not aesthetically pleasing. When working on a drainage system on a site with your own hands, the easiest way is to decorate it with different fractions of crushed stone. You can put larger elements of stones at the bottom of the grooves and sprinkle small ones on top. If desired, the last layer is made from marble chips.

Decorating linear drainage
If this is not available, replace the material with decorative gravel. What does this mean? Having selected some of the fine gravel, it is painted blue, in different shades. By pouring it into the channels of linear drainage systems, you will get the illusion of running water. For a complete association with streams, plant the banks of the ditches with flowering plants. This way you will get not just a functional drainage system, but also a luxurious design element.
Channels dug along the perimeter of the site are often covered with a decorative lattice.

Decorative grating for drainage channel
Filling surface drainage with gravel is not only a matter of aesthetics. In fact, this is also an opportunity to strengthen the walls of the ditches, preventing them from collapsing, and also protect the bottom from washing out. Therefore, by using gravel backfill, you will extend the operational life of your drainage system.
Service Features
When caring for surface drainage, special attention is paid to the cleanliness of the outlet channels. Even small growths on the walls and bottom can cause a decrease in operating efficiency. Drains are inspected after every rainfall. All obstacles that appear in the way of the drain must be removed.

The drainage system needs regular cleaning
The second point will be to control the slope angle of the linear drainage elements. When smoothing it, you will have to adjust the bottom of the channel by digging or adding.
Point drainage is cleaned manually.
Do-it-yourself deep drainage of the site
If the problem of swamping is not in super clayey soil, but in nearby groundwater, then you will have to worry about developing a closed drainage system. Types of work are arranged in the following order:
1. Understand the depth of laying drainage pipes on the site. This indicator is affected by the density of the earth. The higher its numbers, the less deep the drainage. Let's look at an example. Drainage pipes are immersed in sandy soil by at least a meter; for loams this parameter is already 80 cm. In clay soils, pipes are placed no deeper than 75 cm. Why can't drains be installed higher? In addition to soil density, there is another indicator. We are talking about the depth of its freezing. The drains you lay should lie below this mark, then the pipes will not be deformed.

An example of a deep drainage device
2. Select the type of pipes. If surface drainage can be installed without any specific conductors, then for deep drainage of the area, drains will have to be purchased. What does the modern assortment offer? The drainage elements of the system are manufactured:
– made of plastic;
– ceramics;
– asbestos.
Ceramic pipes are quite expensive for installing drainage on a site, but they will last for centuries. There are estates where the closed drainage area made of ceramics has been functioning for 150 years. Asbestos-cement products, although durable, are practically not used today due to their environmental unsafety.
Inexpensive and practical perforated plastic is at the peak of popularity. As a component of deep drainage of the site, pipes from it will need additional protection from clogging with small soil particles. If this is not taken care of initially, then after a very short time the drains will become clogged and will stop letting water through.

Perforated plastic pipes for drainage
It is good to use geotextiles to insulate the drainage pipes of the site. It is only possible to avoid wrapping drains with filter material in clay soil. Here it will be enough to lay the pipe on a twenty-centimeter layer of gravel. This option will not work in loams. The pipes will have to be wrapped in geotextile fabric. The worst thing will happen to owners of sandy plots. Here, the components included in the deep drainage system of the site will have to not only be wrapped in geotextiles, but also covered on all sides with a thick layer of gravel.
Rising groundwater often leads to flooding of the local area, garden or vegetable garden. Excess moisture contributes to soil leaching, as a result of which the foundation sags and the house collapses. Constant dampness interferes with the development of cultivated plants and provokes the growth of lichens and mold.
The question arises, how to drain an area of groundwater if the water has nowhere to go? To prevent such a phenomenon, it is necessary to make drainage in an area with a high groundwater level (GWL). A number of reclamation works on the site can be done with your own hands, using purchased materials and improvised means.
Melt or rain water passes through the upper aquifer, reaches the water-resistant layer (clay) and, along its depressions, rushes to the lowest point - there a zone of excess moisture is formed. When the drains of an impermeable layer cannot cope with large volumes of precipitation, the upper layers of the soil are overflowing with moisture, and groundwater rises. Their effect is especially destructive if there is fine sand above the waterproof clay: in this case, quicksand can form.

An external inspection of the structures and terrain will help to assess the condition of the local area in terms of the proximity of groundwater. The rise of the water horizon and the need for drainage are indicated by the following facts:
- plaster is falling off the walls, door and window frames are warping, glass is missing visible reasons cracks appear - this is evidence of a loss of strength due to the leaching of calcium from the cement;
- there is a constant smell of dampness - it accompanies mold, which negatively affects wooden and concrete structures and is harmful to health;
- the territory is being developed by nettles, coltsfoot, horsetail, hemlock, reeds, wormwood, and licorice;
- the number of mosquitoes, snails and frogs has increased, snakes have appeared;
- the basement or cesspool is filled with water.

If you need to check an empty building plot, a test sounding will help clarify the situation with the water supply system. The data obtained on the composition and quality of the soil will give an accurate answer to the question of whether the site needs to be drained . This is usually recommended when groundwater occurs at a depth of 1-2 meters. Open and closed drainage channels, arrangement of a drainage pond, making artificial embankments, and pumping with a special drainage pump will help lower their level.
Open system
To partially drain an area with a high groundwater level, you can equip a simple network of drainage ditches laid along the entire perimeter of the territory and between the ridges. Rain and melt water are collected in shallow drainage channels, sent to the main canal, and then transported to a drainage well or absorbed into the soil outside the site.
Here are the basic rules for making open drainage with your own hands:
- The main trenches are dug to a depth of at least 40 cm, additional ones are enough to be deepened to 15 cm. The width of the channels depends on their location, usually it is 1/3 of the depth. Be sure to maintain a slight slope of the system to ensure gravity flow.
- Near buildings and various structures, the channel is deepened in relation to the foundation and supporting elements by 25-30 cm.
- Since the walls of the ditches are not reinforced in any way, they cannot be dug along the perimeter of the structures so that the foundation does not deform over time.
Open drainage cannot drain groundwater - it only prevents oversaturation of aquifers with atmospheric moisture. The disadvantage of this option is the reduction in the usable area for planting crops.

An improved version of the open system is backfill drainage. The trenches are covered with a wide strip of geotextile, and coarse gravel is filled up to half the depth. The ditch is filled with fine gravel from above, not reaching the soil level by 10-15 cm. The edges of the geotextile are folded, sand or gravel chips are poured on top of it.
Closed system
This option ensures effective drainage of groundwater and can significantly reduce humidity in an area with high groundwater level. The system is a network of drains - pipes buried below the soil freezing line (so that there are no gusts in winter) and connected to a drainage well.

Work on drainage arrangement is carried out in this order.
- Layout. The optimal “route” for water drainage is drawn. Pipes should run along the perimeter of buildings and in the spaces between trees. When draining a garden plot with a high groundwater level, make sure that there is at least 2.5 m to the trunks. The position of the drainage well is indicated on the plan: it should be in the lower position.
- Marking the site according to the plan. It is performed using pegs and twine.
- Digging trenches. They are located below the freezing line of the soil, and for drainage of the building - below the base of its foundation by 15 cm.
- Making a sand cushion. A layer of coarse sand (10-15 cm) is poured into the bottom of the ditches, filled with water, but not compacted too much. The upper edge of the pillow is formed according to the level, maintaining a constant slope of 1-2 mm per 1 meter - from the top point to the well.
- Laying geotextiles. Its width margin is 25 cm on each side.
- Filling the filter layer with gravel (5-10 cm).
- Pipe laying. You will need ready-made polymer corrugated products in a geotextile shell (protection against silting). For main channels, pipes of 100 mm are needed, and for auxiliary channels - 75 mm. It is advisable to do the installation in a herringbone pattern. At all turns of the route, sand trap wells are installed, into which the ends of the pipes are inserted, but not connected to containers (to make it easier to clean the system).
- Backfilling the filter layer. The space of the ditches is filled with large and medium gravel, not reaching the ground level by 20-30 cm.
- Covering the system. The gravel is covered with the free edges of the geotextile and covered with gravel chips or soil left over from digging the trench.

To prevent clogging of the perforation with clay particles and salt deposits, the system is washed every 2-3 years by running water from a hose into it under pressure.
Raising the area
If even deep drainage does not help to completely get rid of the negative manifestations of ground water, you will have to start grading and backfilling an area with a high groundwater level.

This method is expensive, but provides a real and lasting effect. Regardless of the height of the site, the work plan is approximately the same.
- Territory planning. A detailed plan of the site is drawn up, indicating the elevation level, the location of the surface aquifer, and the thickness of the fertile layer. This will help determine where, how much and what exactly to add. If the geology of the area is complex (swampiness is combined with a high groundwater level, there is a clay layer or voids), it is better to entrust the planning to a specialist.
- Demolition of old buildings (if any).
- Clearing the area. It is freed from vegetation, debris, and the roots are uprooted.
- Laying the drainage system (if it does not already exist). Backfilling alone will not solve the problem of excess moisture. It still needs to be allocated closed or open method which were described earlier.
- Filling the area. A low strip foundation is laid around the area so that the poured material is not washed away by rain. After the concrete has hardened, materials are poured layer by layer (10-15 cm each). Each layer is compacted using a vibrating rammer. After laying all the lower layers, they are left for a couple of weeks for natural shrinkage of 2-3 cm, only then comes the turn of fertile soil. To prevent the layers from mixing, they are separated by geotextiles.
To consolidate the backfill, the area is sown with cereal crops with a branched root system.
Here are answers to the most popular questions from readers regarding land reclamation and drainage structures.
- What material is best to cover the area?
For a rise of 20-30 cm in a small area, fertile soil can be used. If a meter-long layer of bedding is required, the base is made of compacted sand, secondary crushed stone or broken brick is placed in the middle (for drainage), and soil is laid on top. On beds and lawns you can do without crushed stone; instead of soil, paths and platforms are sprinkled with excavated soil. Experts believe that it is better to place soil from the site down. This prevents the heavy crushed stone from sinking into the light sand or the light sand from sliding off the loam.
- Are asbestos or used steel pipes suitable for closed deep drainage?
It is better to use special drainage pipes for drainage of groundwater with ready-made holes and wrapped with geofabric. Other product options quickly become clogged and the drainage fails. As a last resort, take asbestos-cement pipes with a diameter of at least 100-150 mm. To allow water to flow into them, holes are drilled or cuts are made, and to avoid silting, they are wrapped in geofabric.

- What material can be used for drainage instead of crushed stone?
In open systems it can be replaced with bundles of brushwood. Bunches with a diameter of 30 cm are formed as follows: large branches are placed in the center, and small twigs are placed on the outside. Moss is laid on top of the laid mats. On peat soils, such a system remains operational for up to 20 years.
- Is it possible to artificially lower the groundwater level?
To reduce the level of excess moisture to 5 m, a wellpoint filter unit is used. It includes a ground vacuum manifold for releasing water, pumps to reduce its pressure and vertical pipes, at the ends of which wellpoints are located. Sometimes expensive complexes with injection water lifts are used, which can increase the depth of groundwater to 20 m.

- Is it necessary to make a drainage well?
A well is convenient because water can be taken from it for irrigation or other needs. There is a pipe at the top from which water flows out when the container is full. If there is free space on the site, the role of a drainage reservoir can be played by a small pond, the bottom of which is filled with crushed stone and a sand-gravel mixture. Around the drainage pond you can plant moisture-loving plants and equip a recreation area.

The problem of waterlogging is always relevant. Many holiday villages are located in lowlands with clay soil or high groundwater levels. From the end of winter, when the snow is actively melting, it is no longer possible to set foot on the site. And the water sometimes stays until mid-spring!
Gardening work has to be postponed until a later date... And most plants are unable to survive in such conditions! Choose and plan solutions to the problem.
We are building a drainage system
1. If groundwater lies deep, and the only concern is moisture after melting snow or heavy rain, it can be drained using a system of grooves. It is good if the site is located on a slope.
Then at its lowest point you can build a waste pond or well, the water from which can be easily pumped out with a pump.
Surface drainage is done along the entire perimeter of the site and always around buildings.
From the point of view of experts, it is a set of properly installed channels equipped with sand traps, as well as protective grilles that also perform a decorative function. But, say, owners of dachas whose homes are not intended for permanent residence solve this issue more easily. Open concrete trenches are made around buildings, which can be easily cleared of debris with a brush. And along the fences, the grooves are covered with geotextiles and filled with crushed stone or pebbles.
Groundwater can only be dealt with using an underground pipeline. I strongly advise you not to experiment yourself, but to contact a professional to at least determine the water discharge point and draw up a plan for the location of drainage pipes.
Let's sand
2. Gradually add sand to flower beds and beds. It will improve soil absorption and promote a more uniform distribution of moisture over its top layer. For clay soil, about 30 kg of sand is taken per 1 sq.m.
We bring soil
Z. But only when surface drainage has already been completed on the site and a house has been built.
Planting birch and willow trees
4. Due to their powerful root system, these deciduous trees drain the soil well. Unfortunately, this method of draining water is not suitable for small areas.
Site drainage is a system for removing and draining water from the ground using pipes, wells, trenches and other similar devices. In addition, drainage is a material that absorbs excess moisture from the soil when growing plants indoors.
The drainage device on the site is used for lands with high humidity, clay soil and an approximate groundwater level. Such properties of the land negatively affect the growth of trees and flowers, garden crops and other plants. In soil that is too clayey and oversaturated with moisture, they do not take root and simply die.
Excess moisture and the approach of groundwater to the surface of the earth raises the soil and leads to shrinkage of the dacha, bathhouse and outbuildings, flooding of basements and ground floors in the house. In addition, blind areas are destroyed, cracks appear on paths and other decorative elements. To avoid such problems, a drainage structure is used. Let's look at when such a system is needed and find out how to properly drain a site with your own hands.
When is garden drainage needed?
Before starting to install a system on a specific site, determine the type of soil. To do this, make a hole up to 60 centimeters deep, fill it with water and mark the time when the water completely goes into the ground. Drying in one day indicates porous soil; in two days, the soil has a dense, heavy structure.

Thus, the arrangement of the drainage system should be carried out under the following factors:
- The proximity of groundwater to the surface of the earth. The depth of water is 1.5 meters and above;
- Clay and loamy soil;
- Formation of puddles on the surface of the ground during heavy rain;
- Flat plot without slope;
- The site is located on a slope, in which case water flows from the upper levels to the surface during precipitation or melting;
- The location of the site is in a lowland or next to a body of water.
Drainage is not necessary for dry and sandy soil, but it is necessary for clay, forest and very wet soil. Today, there are several types of systems, which include backfill, closed or deep, open or surface drainage of the site. Let's look at the characteristics and arrangement of each type.

| View | Scheme | Peculiarities | Application |
| Open (superficial) | Open ditches are made along the perimeter with a slope without pipes, through which water flows into a drainage ditch common to several areas | Requires constant care and is traumatic | Simple and affordable way Suitable for sloping areas and clay soils |
| Closed (deep) | Drainage pipes are laid into the ground, which drain excess moisture into the drainage well. | Does not interfere with the aesthetics of the land plot | Used for areas with close groundwater |
| Backfill | Along the perimeter, trenches are made on a slope without pipes, which are filled with broken bricks or crushed stone, and gravel is placed on top. The water goes into a drainage well or gutter | Requires an additional layer of filtration and regular cleaning, gets clogged quickly, low throughput | Suitable only for small areas or if the problem of flooding concerns only certain points of the territory |
To properly lay the drainage, you will need a diagram. The plan is drawn up taking into account the characteristics of the soil and groundwater, the layout of the garden plot and the calculation of the required building materials. For areas with high water levels over 1.5 meters, a closed or deep type is chosen. For clay and heavy soil - surface. Let's take a closer look at how to make drainage on a site with your own hands.
Arrangement open or surface drainage system- the easiest and most affordable method that does not require the use of pipes and financial costs. Along the perimeter of the site, ditches are dug with a slope towards the water receiver (common ditch) in accordance with the location plan. The depth of such a trench is approximately 0.7 meters, the width is 0.5 meters, and the angle of inclination is up to 30°. With this system, water runoff goes into a large ditch, which is made outside the garden and used for several areas.

Please note that a surface drainage system will ruin appearance land plot. Decorative grates are often used to cover unattractive open ditches. In addition, you can make the design original and interesting by placing crushed stone and large stones on the bottom, and covering the top layer with colored small pebbles or decorative gravel. Thus, dry streams are obtained, the banks of which are decorated with greenery.
Deep drainage hidden from view and does not interfere with the aesthetics of the garden. It provides effective drainage of the land with increased level groundwater. Pipes for drainage of the area are chosen with a diameter of 63 and 110 millimeters. A suitable pattern for a closed drainage system is a herringbone pattern, in which the side trenches are collected into one, leading to a catch basin (drainage well).

Trenches are dug with a slope of 7 centimeters towards the well. Please note that the denser the earth, the higher the pipes are laid. So, for sandy soil the depth of the ditch is about one meter, for loamy soil - 80, and for clay soil - 70. The bottom of the pits is covered with a layer of sand and crushed stone 20 centimeters high, and pipes are laid on top and assembled into a single system. After laying, the products are covered with geotextiles and then covered with layers of sand and crushed stone of 10-15 centimeters each. By the way, you can buy ready-made geotextile pipes.
Backfill type of drainage experts do not recommend installing it, since it has the lowest throughput and often gets clogged up quickly. In addition, such a system is suitable for a small area and local flooding problems. But if you decide to use this type, then the arrangement begins with digging ditches along the perimeter of the territory.
The trench is half filled with large crushed stone or broken bricks, and then gravel or other small material is laid. The top of the ditches is covered with soil. To prevent the trenches from filling quickly, an additional filter layer of geotextile is made.

Which drainage pipes to choose
In order for the system to work correctly and last as long as possible, you need to choose reliable drainage pipes. Today, ceramic, asbestos-cement and polymer products are distinguished. The first two types are rarely used today, as they are characterized by heavy weight, difficult and expensive installation, and a short service life of up to 20-30 years.
- Service life is 50-60 years;
- Light weight for quick and easy transportation and installation;
- Resistant to negative impact water-resistant and non-corrosive;
- High strength indicators due to uniform load distribution;
- The internal smooth surface does not allow dirt to accumulate inside and prevents clogging;
- Affordable price;
- Possibility to carry out installation yourself.
The most durable are two-layer structures. Please note that long products are more flexible than short ones. It is important that the surface is corrugated on the outside and smooth on the inside.
Arranging a drainage structure is a labor-intensive process that requires correct determination of the soil type and groundwater level. It is important to choose the right type of drainage and perform installation, otherwise the system will be ineffective. To avoid mistakes, turn to professionals! Experienced craftsmen of the MariSrub company will reliably and quickly install drainage on any type of site, select the necessary materials and, if necessary, install a drainage well!
Many have encountered such a common problem as excess moisture in a suburban area. Clay soils do not drain water well, and in the spring, when the snow cover melts, they become heaving. Because of this, the foundations of buildings deteriorate and shift, and road surfaces are destroyed. There is an opinion that it is impossible to do site drainage on clay and loamy soils with your own hands. But this is a myth. Of course, it is better to entrust the drainage of the site to a competent and experienced specialist, but this is not always possible. We will try to figure out how to install a drainage system.
What for?
Excess moisture in the countryside is a serious problem. Its first clear sign is puddles that may not go away for several weeks in a row. This problem can cause the slow destruction of houses and other country buildings and the death of plantings. And few people find it comfortable to walk in rubber boots or constantly watch puddles.
Excess moisture is an unpleasant phenomenon
Often this problem occurs due to perched water. That's what they call it high level underground (ground) waters.

The easiest way
So, how to make drainage on the site? Some craftsmen who decide to make drainage at their dacha with their own hands simply dig ditches (popularly called “drains”) along the perimeter of the site. This is the simplest, most inexpensive and widespread method for removing excess moisture from the surface. And this sometimes solves the problem.


Unfortunately, if the territory is located below the lateral ones adjacent to it, such drainage arrangement will not help, only raising the general ground level will save it. To do this, you need to bring and add soil and level it. But what if the neighbors decide to raise the level too? Still, it is better to close this issue once and for all and initially carry out high-quality drainage of the dacha plot with your own hands, so as not to return to this issue again. Therefore, many people prefer to carefully figure out how to drain the area in order to forget about the problem, like a bad dream.

First thing's first - plan!
First of all, having taken up the construction of the drainage system, they draw a diagram of the future drainage. At this stage, it is important not to make a mistake and take into account all the features of your landscape. Each territory is unique. For example, drainage is also necessary, as on absolutely flat ground. Streams of water wash away the fertile layer and unevenly erode the soil. If you make gross miscalculations, you may have the opposite effect and the situation will not only not change, but will even worsen. This can be avoided by studying possible options, installation rules and principles, and then draw your site drainage project.
First, determine what type of drainage system you will use: surface or deep site drainage (pipes will be required for site drainage).
Surface drainage
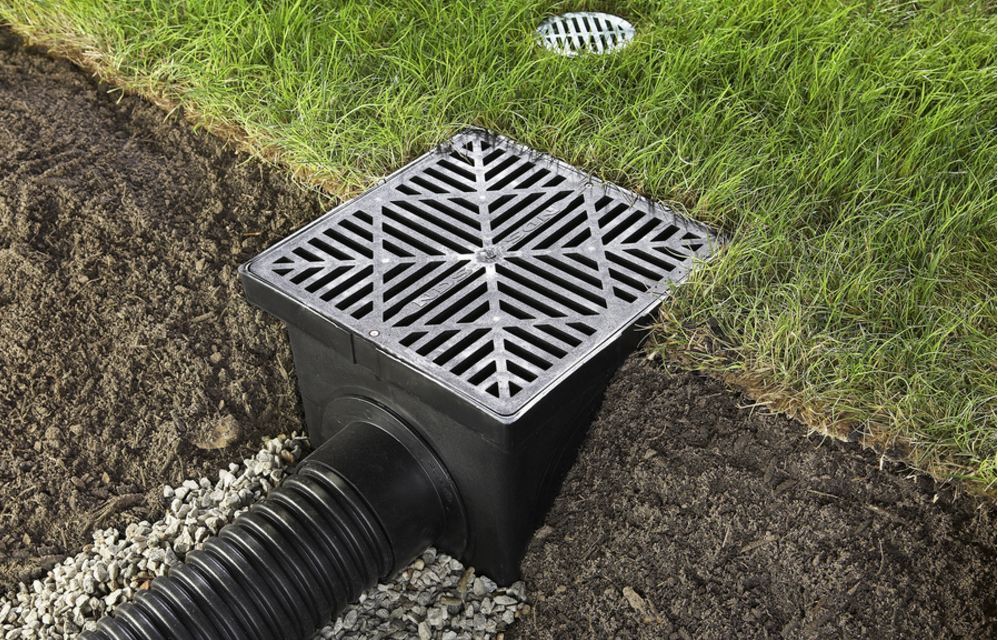
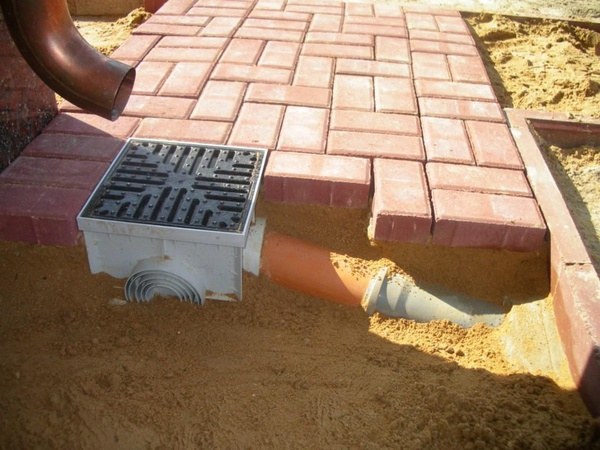
Doing surface drainage of a site with your own hands is relatively easy. Shallow drainage is arranged when they want to protect primarily country buildings, be it a cellar, underground parking or basement. Term shallow is due to the fact that the entire system is in plain sight, on the surface. This system consists of various trays and storm inlets that collect water during rains, downpours and after heavy snowmelt. Surface drainage, in turn, is also divided into two types: linear And spot.
Linear type- this is a chain of trays laid in a certain way. An analogy can be drawn with a canal whose slope is directed towards a well. It is into this that all the water ultimately removed from the trays enters. A similar drainage arrangement on the site is carried out along paths or open parking areas, along the perimeter of sheds and garages. But most often, as a rule, it is the drainage of the house. Such a drainage system on the site has been known to us since Ancient Egypt. The principle is the same, only the materials are more advanced. Nowadays trays made of reinforced concrete or plastic are used. There is a grill built into the top that covers the gutter. There are also special waste bins built into the system to make cleaning easier.

Spot type is a system of water collectors installed in places where it is necessary locally collect water. Catchments are usually installed under taps and in deep depressions, but primarily under gutters. If this is not done, water from the roof will flow to the ground and then penetrate into the soil, destroying the foundation and underground rooms, if any.

Water collectors are installed in the ground so that they are on the same surface as the general soil level. Pipes are drawn from them to sewer system. The top of the catchment area is covered with a grille, which also serves as protection against debris and can act as a decorative element. Drainage basins require cleaning periodically. To do this, you just need to lift the grate and remove the accumulated debris.
Both of these types are often used in pairs for the most efficient drainage system design. The surface type (without pipes) can also include open drainage. In this option, ditches are dug and remain open (in rare cases, they are covered with grates that protect them from large debris). And in order to prevent the walls of the ditch from collapsing and crumbling, they are made at an angle of 30 degrees and laid out with cobblestones or planted with ground cover plants. It is even possible to fill it with crushed stone to prevent destruction, but this will reduce it throughput. Even a beginner can do this kind of drainage with his own hands.
Deep drainage
It is better to install such a system on initial stage landscaping, simultaneously with the construction of the house. In this case, it is better to start draining the land by determining the direction of water flows during rainstorms. Having solved this problem, purchase drainage pipes and geotextiles.

The top layout of the pipes should resemble a herringbone pattern.
Previously, drainage pipes ( drains) were made of asbestos cement and ceramics, but in our time they have given way to plastic: HDPE (polyethylene low pressure), LDPE (polyethylene high pressure) and PVC (polyvinyl chloride). They come in single-layer and double-layer, with a diameter of 100-190 mm. Water-permeable holes of up to 3-5 mm are made across the entire surface. To prevent the perforation from becoming clogged and silting, pipes are most often sold already wrapped in geotextile, which performs a filtration function. On clays and loams it is better to have 2-3 layers of fabric for reliability, since the particles in such soil are smaller and clog the system faster than on sandy loam soils. Drains are laid in the soil to a depth of 1.5-6 m, depending on the requirements. The drainage depth is calculated taking into account the groundwater level.
Wells are installed in places where there are sharp turns or connections between several pipes. They are needed for convenient cleaning of the system in case of unexpected blockage and for inspecting the condition of the drainage pipes. Ultimately, the entire chain of inspection wells and pipes should lead to a common collector well (at the lowest point of the land), from where the water is sent by gravity to a drain outside the territory or is forcibly pumped out manually.

In order for the water to flow in the direction you need, you need to lay pipes at a certain angle. Ideally, you need to make the angle as small as possible, since with rapid water flow, siltation occurs earlier.
As a rule, they do slope from 0.5 to 3 cm per meter pipes.
You can set this angle using a level, a water level, or using improvised materials - an ordinary board and a building level. In the latter case, the board is laid at the bottom of the trench, and a level is placed on top and measured, and adjusted if necessary.
Now let's figure out how to properly construct a drainage ditch. To begin with, we dig trenches (drainage ditches) of the required depth, compact the bottom, and maintain the correct slope (at this stage it can be approximate). Next, pour a 10 cm layer of coarse river sand, spill it and compact it. We carry out the leveling, maintaining the exact slope. Then we lay a layer of geotextile on top with a density not exceeding 200 g per square meter. m. The edges of the fabric should go along the sides of the trench so that they can then be wrapped inside. We pour washed crushed stone onto the geotextile: for clay soils we take a larger fraction (150-250), for sandy loams it can be smaller (up to 150).
Please note: the crushed stone should not be limestone, as it is highly susceptible to erosion and deformation under conditions of temperature changes.
We lay the drainage pipe and gradually fill it with crushed stone in layers and compact it thoroughly. There should be a 10-30 cm layer of crushed stone on top of the drain. We wrap the geotextile inside so that the overlap of the edges is at least 15 cm. Next, pour river sand, and at the very end - fertile soil. The drainage ditch is ready.

Installing a drainage ditch requires a certain investment of time and money, but this work is done once and for all, so it makes sense to do it with the utmost quality.

